Showing posts with label photography. Show all posts

Tuesday, 4 February 2014

Paperwork

Lately I have been making some  crafty bits and pieces, mostly to use as a prop for my photos.  I made 3 headpieces, this one is the first, very easy to do, just some crepe paper flowers, pompom style.


It was meant for my Camera Club January competition, which was themed Contrasting/Complementary colours. Now that I posted here, I see several flaws in it, specially the colour of her top, which went a bit crazy. Sigh, I am sure that the judge will point it out this Thursday.

Have a nice day!

Wednesday, 2 January 2013

Happy New Year!

I hope you a very happy, lucky and sucessfull 2013!

I will start this year with a few resolutions, as it is traditionally done.

Everything is tied to my One Little Word of choice: PLAN. As is the verb to plan, not the noun.

One Little Word is a idea which I believe was started by Ali Edwards, where you choose a word on which to focus for the year. She runs a workshop every year, but I am not using it do to anything creative with it, just to remind me to plan.

I am a huge procrastinator and can be sidetracked easily, so I have to PLAN every day, setting myself small, achievable goals.

Some of my resolutions are to eat better, exercise and educate my children.

I am also doing Project 365 again. A photo a day for the whole year. I hope to do better than I did last time, but I won't consider it a failure if I miss a day or two every now and them. I am more focused in learning and practising in every shot than having a perfect record.

Inspired by the theme suggested in the ILP forum - Myths, Legends and Make Believe - I took my first couple of photos.

I only started officially today (01/01/13), because it's neat that way, but I took a practise shot yesterday.  I taped a Christmas decoration on the window and placed a pot of tulips in front of it.


And today's is called Amazed. The "fairy" is something my son got with his Happy Meal in McDonalds, I was going to put it in the bin, I am glad now that he didn't let me.


Friday, 2 November 2012

The day after...

Halloween last year, I started my Photo-A-Day project. I thought it was project 365, but I forgot to take into account that  2012 was a leap year. Silly me. Not that it mattered, because I didn't take a photo everyday, but I took a photo most of days. I haven't counted how many but I would guess my "success rate" was somewhere between 300 and 320. I have uploaded most of the photos in shuttercal - when I am done, I'll count them up and let you know.

What is worth it? YES. Did I become a better photographer? Probably. What could I have done better? I should have challenged myself more. Did I enjoy it? Yes. 

This Halloween was my first free day, no obligatory photos. But of course, I took some (bad) photos of  my children in costume. Also we drove from Tralee to Dingle and back - beautiful scenery - it was a rainy day with sunshine too,  and we saw a record number of rainbows, 4 or 5 I think. We were in the car and couldn't stop, but I managed to take a few pics from the car.


And yes, I will continue to take a photo a day.

I am giving myself a few days' break. I want to first make an album with all the photos I took. Also I want thing about what I want to accomplish with my second year of photos.

If you have in any way interested in photography, it is a great exercise, I thought I would become to hate it at some stage but it didn't happen. Granted, there were some days (weeks!) when I couldn't think of anything interested to photography but on the whole it was a great experience.


Friday, 14 September 2012

Red

Last week I decided to take  monochromatic colours. Tuesday I choose red.


Wednesday, 22 August 2012

Portraits

Every week I decide that in the next one, I'll definitely take a photo a day. Then I get distracted and don't. It is very frustrating specially as it is completely under my control.
But as I sat down to look at last week's photos, I realised that at least I took some photos - and some of then are actually ok. Not perfect, but ok.


I like this spot in the kitchen, with a big window in front, but I noticed that the oposite side was dark so to remedy it I persuaded my son to hold a big white card to act as a reflector. Of course, being who he is, he wouldn't hold it right and it got in the photo and I had to edit it out.

Sigh. I have two children. One is cooperative and the other is not. Won't be the model and won't be the assistant either...

Wednesday, 15 August 2012

Drawing + Photos

Last week I took photos 6 days out of 7. I tried to added my own drawings on the photos, inspired by Kari Herer's photos about which I posted last week.


Neither the drawing nor the photo is even close in quality to the originals, but it is an interesting concept and I am glad I tried.

One thing that always fascinates me is glass how it distorts the shapes, so I played with this here. More doodles...


I am loving drawing free hand, no sketching, just draw without thinking too much. Flowers are a forgiving subject, so they are ideal.  I'll scan a couple of my doodles for a freebie later this week.

This week I am working on photographing handmade stuff and/or portraits.

Wednesday, 8 August 2012

Still doing Photo A Day

Well, sort of, in fairness I should rename it "4 or more photos a week project".  I definitely take lots of photos most of the days, but there are days I couldn't be bothered.

If you look at my Shuttercal calendar, it is full of holes, but I''ll try to be more diligent. I found that my best photos come when I set some sort of target, so this week I am going for 2D/3D. That is, mixing dimensional object with photos/prints or drawing. That's something I've done in the past. In fact, my first photo of the 365 project is 2D/3D: ( cup and spoon over an old drawing of mine)


I like this one too: (buttons over a Dulux paint brochure)


And recently I came across this beauty in pinterest: (by Kari Herer)


I am trying to do something creative this week, but for the time being, I'll leave you last week's photo of my son who, after seeing her sister's crown, demanded one for him too.


Friday, 3 August 2012

10 years

Wednesday was a special day because 10 years before this girl joined our family. Lucky us.


Happy Adoption Day, L!

Tuesday, 15 May 2012

The Big Moon and the big mess

Ten days ago, I was driving my daughter to a birthday party when I looked towards Howth and noticed that the moon looked remarkably big. It was a clear evening and the whole scenery, I pointed it to my daughter but she wasn't that impressed...

After I dropped her at her friend's, I went home, grabbed my camera and headed back towards Howth. I meant to just stop the car and take a few shots, but my husband shouted to get the tripod too. By the time I got back, it was much darker and a cloud had covered the moon, so it didn't look as impressive, but still I took a few shots. I am glad I had the tripod, as handheld camera would have resulted in blurry photos. I didn't get the exposure right and the photos are very grainy, but I am glad I went back.


Later, looking on the web, I saw that it was indeed the day the moon was the closest to the Earth. There were some amazing pics taken that day, google big moon and see.

At home, I trying to handle another biggie, the big mess in my craft room.

Starting small, I chose to sort out my embroidery threads. Which I use for anything but embroidery. Sometimes I use them to tie something, or to hand stitch a layout or card.

Anyway, there were in a big tangle. These are only a few:


I was wishing I had wooden spools, and then I had a little brain wave. I looked that the Silhouette shapes and found a spool shade. Silhouette, by the way, is a digital cutting machine. Then I figured out how to fill the shape with a wood pattern, printed, cut, folded and here's the result:


After I finished, I cut a little notch at the top to secure the end of the thread:


And the whole set:


Not such a big crafty achievement, say you, but I am so pleased with it - it looks nice and organized and I found a new feature in the Silhouette. That's the advantage for not reading the manual. You find little surprised every now and then. TFL!

Friday, 11 May 2012

A Photo Hunt

Back in February, in a attempt to get my own photo inspiration going, I challenged the children togo in a photo hunt.

I printed out a sheet with stuff to look for (which my son insisted should be called "activity sheet");  armed my son with an old point & shoot, my daughter with her own mobile phone and I with my DSLR and headed to the Botanic Gardens.

It was a partial success, as we arrived there a bit too late, and by the time we had something to eat, the gardens were due to close soon.

Still, we managed to take a few photos as I had set relatively easy tasks. Finding a leaf or a flower in a botanic garden is not exactly that hard!

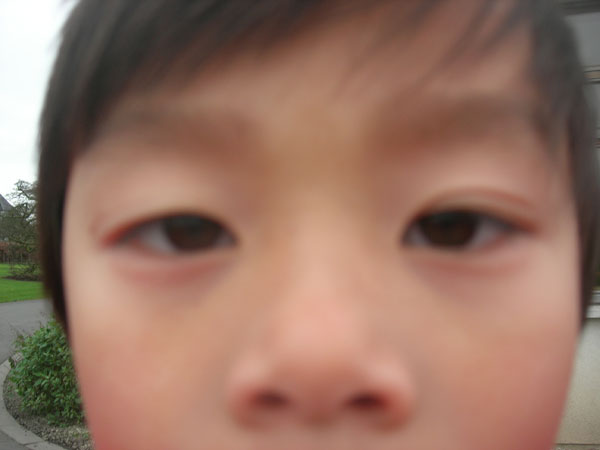
One item was a self portrait. My son asked what that was, and when he understood the concept, he turned the camera towards him and pressed the shutter. It came out of focus, and only his nose and eyes show, but I love it.

Asian eyelids are usually hidden, you usually don't see a "line" above their eyes. When I was a child, I had one eye with hidden eyelid and one with a visible eyelid, which made one eye look bigger than the other. This eventually corrected itself, but sometimes, usually when I am tired, I get this look again. So does my mother. And my son is the same:


It's only a coincidence, since my son was adopted when he was a baby, but I treasure these connections. (To be clear, it wouldn't matter if my child was completely different, I would still love him the same, but I am just sayin'; it is nice.)

I wanted to scrap this photo along other ones he took in the photo hunt. Since the photos had lots of green in it, I added red to balance the overall look.


It was a hard set to scrap, as they wouldn't be the sort of photo I'd normally choose, but I am really pleased that I managed to come with something is ok-ish.

TFL!

Thursday, 19 August 2010

Howth

Last weekend we got a call from a friend - would the kids like to go for  a boat trip around Howth harbour? They said yes - my intention was to stay inland and take some photos, but I was told I could get much better photos from the boat. He was right.


On the way back, in the car, my husband stopped so that I could take some more photos, there was a light mist, giving the whole scene a washed out watercolour-like feel.  I played with some of the Pioneer Woman's actions for PSE, to make it look like an old photo.

Sunday, 29 June 2008

Photography, bokeh and punches

The biggest problem on being a scrapbooker is that there are so many ways to get sidetracked. Some get into cards, some into altered art or ATC or circle journals or, worse, into blog-hopping... I am particular vulnerable to the last one :-), photography being the other one.

I am still very much a beginner, getting a good photo is still more a matter of good luck than skills, but I am spending more and more time trying to learn about my camera and master the manual more of my DSLR.

That's how I came across the term bokeh, which seems to refer to the blurry bits of your photo. Trivial? Google it and you find out how many people are obsessed about it.

I was thinking, right, but at the moment I am more worried about the bits that SHOULD be in focus but are not, thank you. Then I found out that you can trick your camera to make cute shaped bokehs.

Look at this photo of my Maneki Neko:


{ wanna know what is a maneki neco? check mella's blog }

Don't you love the cute hearts behind the cat? How did I do it? Look here.

You can cut out your heart (or whatever else) manually but I used a small heart shaped punch.

There's a bit of trial and error before you get a satisfactory result. The easiest way to get an array of heart shaped images in your photo is to use fairy lights. Test taking some photos of them (without the hood), you're after a nice round blurry light, just like here:


When you get the result above, put your hood on and take a photo with the same settings. Enjoy!

Saturday, 14 June 2008

Note to self - printing at home

Most of the time, I print the photos I scrap in my printer at home, an HP Photosmart C5180. While sometimes the photo turned out OK, other times what I saw in print looked very different from what I saw in the screen.

I've asked advice and was told that I had to, first, calibrate my monitor, and then use the correct ICC profile for my printer and paper.

I still believe that my monitor is not properly calibrated, but today, after trying and trying I think I got the printer setting working if not perfectly, better. I know I'll forget all the steps so I decided to write it down here. Who knows, it might help someone else who uses PSE and the same printer.

1) On your PC, go to the start menu, select "Printer and Faxes", select your printer and then click on "File" -> "Printing Preferences...".

2) In the Printing Preferences window, select the "Printing shortcuts" tab. Select the proper paper/size configuration. In my case A4 Premium Plus paper. In "Color Management", select "Application Managed colors"

3) Select the "Colors" tab. Under "Color Management" select ICC. Under "Rendering Intent" select "Perceptual". Press "OK".

4) Start PSE, open your file.

5) (optional) Select "Image" -> "Convert Color profile" -> "Apply AdobeRGB profile".

6) Select "File" -> "Print...".

Under colour management you should see:
Color Handling = Photoshop Element Manages Colors
Source Space = AdobeRGB (if you did step 5, or if your photo was already using Adobe RGB)
Rendering Intent = Perceptual

Choose the appropriate profile for your paper/printer. In my case HP PS C6100_C8100 Prem Plus Photo.

7) Print it!

I know that someone with a proper understanding of colour management will finds 100s of holes here, but after spending a ton of paper and ink, this is the best I could manage. If someone reads this, I'll say congratulations, I hope you didn't fall asleep in the meantime, and if you found any errors or have a better way, please please tell me. Thanks!!!