Tuesday, 12 June 2012

Blue cards

I am still obsessed with the idea of using stencil or silhouette shapes in cards, like the bird card I made a while ago.

This time I used another dingbat, HFF Aqua Stencil. I made a few for boy's birthday cards but it would suit a baby card too, I think.


I sprayed a bit of a shiny mist over the blue cardstock, which looks nice in real life, but doesn't photography well.


And with scraps, a masculine birthday card:


Saturday, 9 June 2012

From pin to execution

My two obsessions at the moment are the Silhouette Cameo and pinterest. Hardly anything I am making so far doesn't use the first one or is inspired by something I pinned/found in pinterest.

The first one is because I think it allows me to make things I always wanted but never had the inclination to cut by hand. The second is a fantastic repository of ideas, and from the beginning I am trying to only pin things that truly inspire me. Even if I love something I won't pin it unless I think I could make something similar or I could use as a springboard to something.

Here are two pins which I used to make my own stuff:

This origami dress, at 59 repins, is probably the most popular thing I pinned.


It is a very simple card, but very striking. The dress itself is not hard to make, while it might take a while for a novice to remember all the folds, once you learn, you could do it while watching TV at the same time. The excelent video tutorial for the origami, by noorinaya is here.

Here's my take:


And in this version, I ysed a border punch on the hemline:


This one is is another beauty:


Now, it one takes much longer to make. I made several of them and oh, boy, it took a looong time to finish them. I wanted to make something special for a special bunch of girls and it was worth it, as they turned out as I wished them to. According to the source website they're called  shiori ningyo which means bookmark dolls.

I placed my ningyos inside acetate pockets in the front of my cards:


Now I see I started with the Silhouette but nothing in this post uses it, but it's getting late and I'll leave it to my next post. Good night!

TFL!


Sunday, 27 May 2012

Remember Dingbats?

Dingbats are fonts where letters are replaced by images or shapes.  I thought it would be fun to get an interesting shape and cut the shape out off a card and back with patterned paper.

I found a beautiful bird font, HFF Bird Stencil, by Have Fun With Fonts, in dafont.com, which I knew it would be perfect.

Again, I used the Silhouette Cameo, which is my toy of the moment. Here's the cutout:


And the final result where I added with patterned paper. Basic Grey is perfect for this:


I think I'll make a few of them, to have as a stand-by thank you and birthday cards.

Thanks for looking!

Thursday, 24 May 2012

Between a challenge and a pin...

... I got a layout finished.

Scrappyally proposed a challenge in the Studio Calico forum. A lift-the-person-above challenge, where everybody would lift the person that posted ahead of you. I got nik91917 who at the time had only a single layout in her gallery. She kindly added a few more, but then I had my mind up with the first one.

Here's her layout:

What I noticed first in her layout were the title in brackets and the zigzag pattern in  the back. I also liked the layering, but I am rubbish at layering so I decided to leave it.

Zigzags and chevrons are everywhere, but I haven't used them yet, so that was the perfect excuse. I wanted to use a wood patterned paper, and that reminded me of something I had pinned in pinterest:


Put the two inspirations together and you get this:

*Patterned Paper: Farmhouse Collection by Crate Paper
*Mist: Studio Calico
*Fonts: Bebas Neue, VTPortableRemington
*Stickers: Cosmo Cricket
*Also: cardstock, washi tape, Silhouette Cameo

TFL!

Monday, 21 May 2012

April'12

This is last month's summary layout - I am not up to day, I still have Jan/Feb/March to do, hehehe.


The photos were taking in Brazil and they're really colourful and they clashed with the circles, so I converted to b&w. The full colour pics are going to a mini-album, a simple photo album which I am making via photobox. That way I can have it printed 3 times, one for us, one for my bro and one for my parents.

I used the Silhouette to cut the sunburst circles and the title.

TFL!

Tuesday, 15 May 2012

The Big Moon and the big mess

Ten days ago, I was driving my daughter to a birthday party when I looked towards Howth and noticed that the moon looked remarkably big. It was a clear evening and the whole scenery, I pointed it to my daughter but she wasn't that impressed...

After I dropped her at her friend's, I went home, grabbed my camera and headed back towards Howth. I meant to just stop the car and take a few shots, but my husband shouted to get the tripod too. By the time I got back, it was much darker and a cloud had covered the moon, so it didn't look as impressive, but still I took a few shots. I am glad I had the tripod, as handheld camera would have resulted in blurry photos. I didn't get the exposure right and the photos are very grainy, but I am glad I went back.


Later, looking on the web, I saw that it was indeed the day the moon was the closest to the Earth. There were some amazing pics taken that day, google big moon and see.

At home, I trying to handle another biggie, the big mess in my craft room.

Starting small, I chose to sort out my embroidery threads. Which I use for anything but embroidery. Sometimes I use them to tie something, or to hand stitch a layout or card.

Anyway, there were in a big tangle. These are only a few:


I was wishing I had wooden spools, and then I had a little brain wave. I looked that the Silhouette shapes and found a spool shade. Silhouette, by the way, is a digital cutting machine. Then I figured out how to fill the shape with a wood pattern, printed, cut, folded and here's the result:


After I finished, I cut a little notch at the top to secure the end of the thread:


And the whole set:


Not such a big crafty achievement, say you, but I am so pleased with it - it looks nice and organized and I found a new feature in the Silhouette. That's the advantage for not reading the manual. You find little surprised every now and then. TFL!

Friday, 11 May 2012

A Photo Hunt

Back in February, in a attempt to get my own photo inspiration going, I challenged the children togo in a photo hunt.

I printed out a sheet with stuff to look for (which my son insisted should be called "activity sheet");  armed my son with an old point & shoot, my daughter with her own mobile phone and I with my DSLR and headed to the Botanic Gardens.

It was a partial success, as we arrived there a bit too late, and by the time we had something to eat, the gardens were due to close soon.

Still, we managed to take a few photos as I had set relatively easy tasks. Finding a leaf or a flower in a botanic garden is not exactly that hard!

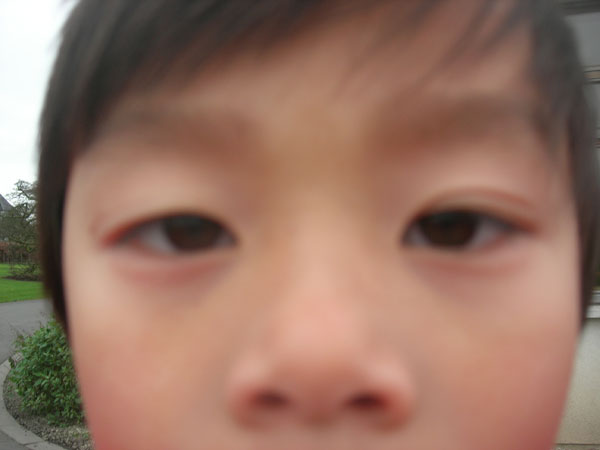
One item was a self portrait. My son asked what that was, and when he understood the concept, he turned the camera towards him and pressed the shutter. It came out of focus, and only his nose and eyes show, but I love it.

Asian eyelids are usually hidden, you usually don't see a "line" above their eyes. When I was a child, I had one eye with hidden eyelid and one with a visible eyelid, which made one eye look bigger than the other. This eventually corrected itself, but sometimes, usually when I am tired, I get this look again. So does my mother. And my son is the same:


It's only a coincidence, since my son was adopted when he was a baby, but I treasure these connections. (To be clear, it wouldn't matter if my child was completely different, I would still love him the same, but I am just sayin'; it is nice.)

I wanted to scrap this photo along other ones he took in the photo hunt. Since the photos had lots of green in it, I added red to balance the overall look.


It was a hard set to scrap, as they wouldn't be the sort of photo I'd normally choose, but I am really pleased that I managed to come with something is ok-ish.

TFL!